Recognizing Snacks using SimpleCV
By Benny Cheung on
This article aims to provide the basic knowledge of how to recognize snacks by using Python and SimpleCV. Readers will gain practical programming knowledge via experimentation with the Python scripts included in the Snack Classifier open source project.
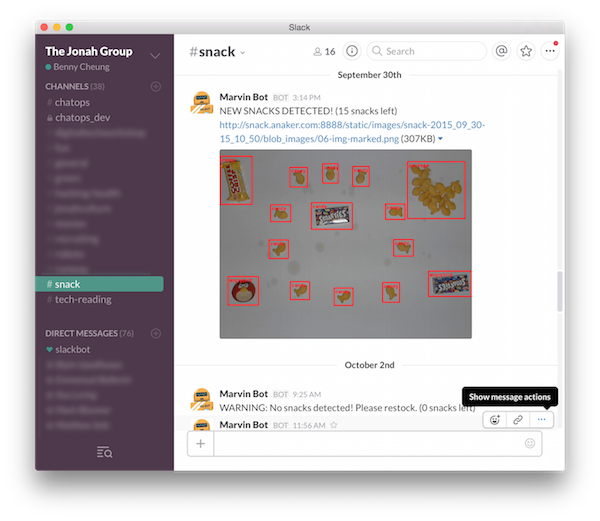
To illustrate with a snacks recognition app, the Snack Watcher watches any snacks present on the snack table. For Snack Watcher to determine if there was an interesting event, it needs to process the image into a set of image “Blobs”. For each “Blob”, Snack Watcher compares the “Blob” with it’s previous state to determine if the “Blob” was added, removed or stationary.
More interestingly, the Snack Watcher can be configured to recognize if that “Blob” looks like a particular kind of snack (e.g. cookie or candy). In the following Snack Watcher captured image, we can see the snacks have been classified and the results are labelled with their kind, reporting the “NEW SNACKS DETECTED!” event onto a message channel.
The Magics of Vision and Classification
The Python computer vision’s framework, SimpleCV is an OpenCV wrapper, that makes processing, detecting, and displaying image simple, so that we don’t need to invest great effort to achieve interesting results. For machine learning and data classification, SimpleCV is built on top of the Orange framework. Orange implements a rich set of image extraction operators and machine learning algorithms to support our goal - the snack classification. For setting up OpenCV, SimpleCV and Orange for a Raspberry Pi project, please refer to this blog post Raspberry Pi 3 for Computer Vision for instructions.
The best way to learn about snack classification is trying it out.
The Snack Classifier is an open source project for snack classification. It comes with two Python scripts to help experiment with the system. Once the concepts are affirmed after experimenting with the scripts, the Snack Classifier can be used as a Microservice to support your snack classification tasks; extending the overall goal of effective snack watching!
Python Scripts for Supervised Machine Learning
The Python scripts described in here can be used as a Supervised Machine Learning tools.
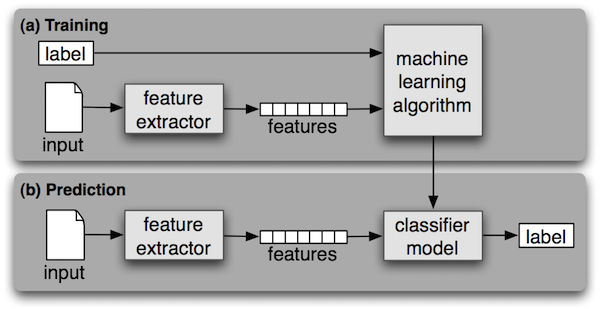
The typical supervised machine learning will go through two stages (see picture below).
During the first stage (a) Training,
the computer is presented with example inputs and their desired outputs label (aka. class, such as cookies),
running through a set of feature extractors to summarize the input as a vector of features.
With the support of the SimpleCV machine learning algorithms,
the system generates a classifier model which can
effectively classify the training inputs.
The second stage (b) Prediction, can take a unknown input sample,
running through the same set of feature extractors to summarize the unknown as a
vector of features. With the classifier model obtained from training, the unknown
input can be classified as the result label (e.g. cookies).
(a) Snack Training (Python Script)
This script has been inspired by this article, A fruit image classifier with Python and SimpleCV. We have enhanced the article’s code snippet to make an easy to use Snack Training and Classifier scripts.
Usage: snack-trainer.py [options] -c <classes> -m <method>

Options:
  -h, --help            show this help message and exit
  -g, --debug           debugging mode
  -c CLASSES, --class=CLASSES
                        detect classes, comma seperated
  -a TRAIN_PATH, --train=TRAIN_PATH
                        training samples path
  -t TEST_PATH, --test=TEST_PATH
                        testing samples path
  -r RESULT_PATH, --result=RESULT_PATH
                        testing results path
  -s CLASSIFIER, --classifier=CLASSIFIER
                        using classifier (svm|tree|bayes|knn)
  -f FEATURE_PATH, --feature=FEATURE_PATH
                        save training features into file
  -e CLASSIFIER_FILE, --save=CLASSIFIER_FILE
                        save classifier into file
The default path containing all the training images is train,
the default path containing all the testing images is test and
the default path where the results are written is result. Of course, you
can change the directories with the corresponding commandline options.
All image classes must be layout into the separate directories.
The class labels must be aligned to the directories.
For example, if we have 2 classes cookie and other, the directory layout should be like,
  train
  |____cookie
  | |____cookie_001.png
  | |____cookie_002.png
  | |____ ...
  |____other
  | |____other_001.png
  | |____other_002.png
  | |____ ...

  test
  |____cookie
  | |____test_001.png
  | |____test_002.png
  | |____ ...
  |____other
  | |____test_003.png
  | |____test_004.png
  | |____ ...
After we setup all the image directories, we can execute the snack-trainer.py by,
python snack-trainer.py -g -c "cookie,other" -s tree
In this example, we are classifying cookie and other. We specify to use tree classifier to classify the test images. The result annotated images will be saved into result.
In addition, the trained classifier parameters are saved into, default by the classifier name, e.g. tree.dat.
We can use this classifier file for further image classification by executing
snack-classify.py after training.
(b) Snack Prediction (Python Script)
If we are using tree classifier for training, the default trained classifier will be saved as tree.dat (Note: the snack-trainer.py has an option to control the classifier saved filename if needed).
Subsequently, we can use tree.dat to reconstruct the classifier for classifying other images. snack-classfy.py is the utility program to perform further image classifications.
Usage: snack-classify.py [options] -c <classifier_file> -i <image>

Options:
  -h, --help            show this help message and exit
  -g, --debug           debugging mode
  -c CLASSIFIER_FILE, --classifier=CLASSIFIER_FILE
                        load classifier from file
  -i IMAGE_FILE, --image=IMAGE_FILE
                        classify this image file
If we want to classify something.png image, we can execute,
python snack-classify.py -c tree.dat -i something.png
It would reply the classified name for the given image.
SimpleCV Packages
To deepen our practical knowledge of image training and classification, this section is aimed to show a series of Python code snippets. It is not meant to give an exhaustive tutorial of the SimpleCV machine learning packages here, instead you can obtain the full detail in SimpleCV Documentation.
This illustrates how to use SimpleCV machine learning packages within the context of training and classifying snacks. It demonstrates the practical usage of the SimpleCV methods; we can learn how the Snack Classifier’s Microservice was built.
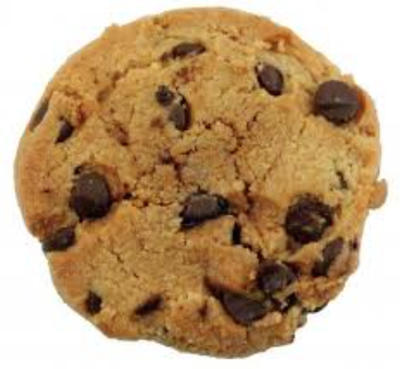
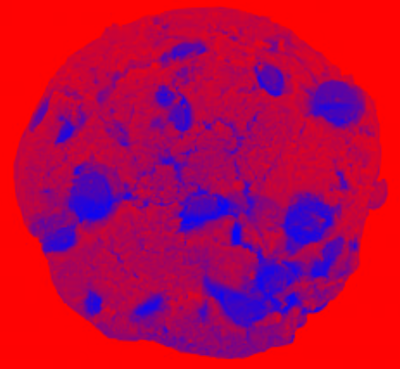
For the code snippets, we are referring to this sample Cookie Image, download it and work along with the following code snippets.
 ,
,
SimpleCV Feature Extraction
In this section, we are playing with SimpleCV Feature Package.
Edge Feature Extractor
This extractor method takes in an image, applies an edge detector, and calculates the length and direction of lines in the image. The value of the lines are accumulated into bins and formed a 1D edge length histogram and 1D edge angle histogram.
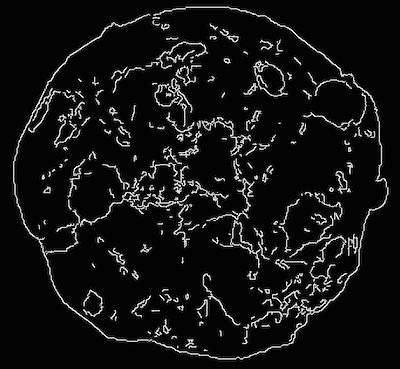
For example, we would like to do the edge histogram feature extraction from cookie_001.png image. The features are slotted into e.g. 5 bins. Then, we print out the feature field names and their values.
edge = EdgeHistogramFeatureExtractor(5)
img = Image('cookie_001.png')

edge_vecs = edge.extract(img)
edge_fields = edge.getFieldNames()
for i in range(0, edge.getNumFields()):
    print edge_fields[i], '=', edge_vecs[i]
The result would be like,
Length0 = 1.80579216354
Length1 = 1.66950596252
Length2 = 0.834752981261
Length3 = 0.45996592845
Length4 = 0.229982964225
Angle0 = 0.0
Angle1 = 0.00384859186815
Angle2 = 0.00635017658245
Angle3 = 0.00369012043829
Angle4 = 0.0
When you inspect the statistical results of the edge extraction, the results make intuitive sense that the small segments are dominating over the long segments. The edge’s angles produce a normal distribution of the angular values.
Hue Feature Extractor
This feature extractor takes in an image, gets the hue channel, bins the number of pixels with a particular hue values. The hue values are accumulated into bins and formed a 1D hue histogram.
For example, we would like to do the hue histogram feature extraction from cookie_001.png image. The features are slotted into e.g. 5 bins. Then, we print out the feature field names and their values.
hue = HueHistogramFeatureExtractor(5)
img = Image('cookie_001.png')

hue_vecs = hue.extract(img)
hue_fields = hue.getFieldNames()
for i in range(0, hue.getNumFields()):
    print hue_fields[i], '=', hue_vecs[i]
The result would be like,
Hue0 = 0.0183470315515
Hue1 = 0.000665208703398
Hue2 = 0.000427097170245
Hue3 = 0.000168505712084
Hue4 = 0.0
The result says the “reddish” colour dominating this sample cookie image.
Haar Feature Extractor
This extractor generates Haar-like features from an image. These Haar-like features are used by a the classifiers of machine learning to help identify objects or things in the picture by their segmentation contrast, or in this case - Haar-like features. Interested reader can get a more in-depth review of Haar-Like Features
For example, we will use SimpleCV’s haar.txt file for defining the set of Haar-like features extraction parameters. Then, we print out the feature field names and their values. Since extractor produces a lot of features, the result has been clipped for displaying in here.
haar = HaarLikeFeatureExtractor(fname='haar.txt')
img = Image('cookie_001.png')

haar_vecs = haar.extract(img)
haar_fields = haar.getFieldNames()
for i in range(0, len(haar_fields)):
    print haar_fields[i], '=', haar_vecs[i]
The result would be like,
feature2x1_1 = 2242356.0
feature2x1_2 = 498204.0
feature2x2_1 = -1306748.0
feature3x1_1 = 22915652.0
...
Angle_feature2x1_1 = 2242356.0
Angle_feature2x1_2 = 498204.0
Angle_feature2x2_1 = -1306748.0
Angle_feature3x1_1 = 22915652.0
...
SimpleCV Classification (aka Machine Learning)
In this section, we will explore the SimpleCV Machine Learning Package. We are describing four classifiers, SVM, Tree, Navie Bayes and KNN in this section.
SVM (Support Vector Machine) Classifier
Given a set of training examples, each marked for belonging to one of two categories, an SVM training algorithm builds a model that assigns new examples into one category or the other, making it a non-probabilistic binary linear classifier. An SVM model is a representation of the examples as points in space, mapped so that the examples of the separate categories are divided by a clear gap that is as wide as possible. Read more: http://en.wikipedia.org/wiki/Support_vector_machine
Tree Classifier
A decision tree is a flowchart-like structure in which each internal node represents a “test” on an attribute (e.g. whether a coin flip comes up heads or tails), each branch represents the outcome of the test and each leaf node represents a class label (decision taken after computing all attributes). The paths from root to leaf represents classification rules. Read more: http://en.wikipedia.org/wiki/Decision_trees
Naive Bayes Classifier
Naive Bayes is a simple technique for constructing classifiers: models that assign class labels to problem instances, represented as vectors of feature values, where the class labels are drawn from some finite set. It is not a single algorithm for training such classifiers, but a family of algorithms based on a common principle: all naive Bayes classifiers assume that the value of a particular feature is independent of the value of any other feature, given the class variable. For example, a fruit may be considered to be an apple if it is red, round, and about 10 cm in diameter. A naive Bayes classifier considers each of these features to contribute independently to the probability that this fruit is an apple, regardless of any possible correlations between the color, roundness and diameter features. Read more: http://en.wikipedia.org/wiki/Naive_bayes
KNN (K Nearest Neighbor) Classifier
In k-NN classification, the output is a class membership. An object is classified by a majority vote of its neighbors, with the object being assigned to the class most common among its k nearest neighbors (k is a positive integer, typically small). If k = 1, then the object is simply assigned to the class of that single nearest neighbor. Read more: http://en.wikipedia.org/wiki/K-nearest_neighbor_algorithm
Image Feature Extraction & Classification
With the extractors and classifiers accumulated up to this point, we are ready to incorporate this knowledge into a full image extraction and classification example.
def getExtractors():
    hue = HueHistogramFeatureExtractor(10)
    edge = EdgeHistogramFeatureExtractor(10)
    haar = HaarLikeFeatureExtractor(fname='haar.txt')
    return [hue, edge, haar]

def getClassifiers(extractors):
    svm = SVMClassifier(extractors)
    tree = TreeClassifier(extractors)
    bayes = NaiveBayesClassifier(extractors)
    knn = KNNClassifier(extractors)
    return {
        'svm': svm,
        'tree': tree,
        'bayes': bayes,
        'knn': knn
    }

extractors = getExtractors()
classifiers = getClassifiers(extractors)
We obtained the classifiers by constructing them with a set of extractors. To break the code snippet down a little more,
we have created a set of extractors, namely hue, edge and haar extractors. These extractors are capable of
taking an image and extracting the essential features from it.
The hue extractor will notice the pixels’ hue and slot the values into bins.
Similar, edge and haar extractors will perform their special calculation for an image.
Mathematically, these extractors have vectorized image characteristics into a set of feature values.
A feature, such as hue of red, could be characterized by value of 0.018 in field name of Hue0 for example.
We can think of feature vector as a kind of formal description for an image.
Every image from our training set will be characterized as a feature vector.
img = Image('cookie_001.png')
hue_feature_vec = extractors[0].extract(img)
print hue_feature_vec
The printout of hue_feature_vect will be like,
  [0.03549028421988077,
   0.001203778883175249,
   0.00035178807892081684,
   0.0009786293278747852,
   0.00033078967479953006,
   0.000523404665689852,
   0.00028308959630179216,
   5.3921827867008034e-05,
   0.0,
   0.0]
We have read the image cookie_001.png, and use hue extractor (in the example code, extractors[0],
to extract the hue feature vector with their binned values.
  img = Image('cookie_001.png')

  # iterating through all the extractors, and combine their extracted vectors
  feature_name = []
  feature_vec = []
  for i in range(0, len(extractors)):
      feature_name += extractors[i].getFieldNames()
      feature_vec += extractors[i].extract(img)

  # we can see how many features are extracted
  print "Total number of features:", len(feature_name)
  print "Total number of values:", len(feature_vec)
  print

  # display some random sample features
  for x in range(0, 8):
      i = int(random.random()*len(feature_name))
      print feature_name[i], '=', feature_vec[i]
The code is written to list 8 random features fields and values for illustration.
Total number of features: 260
Total number of values: 260

Angle_feature4x2_8 = 1662682.0
Angle_feature4x4_10 = 5007468.0
Angle0 = 0.0
Angle_feature5x1_8 = 16554016.0
Angle2 = 0.00310151227022
feature3x1_4 = 23657996.0
Angle_feature5x1_12 = -181856.0
Angle_feature4x1_1 = 43748.0
The classifier will use the extractors, obtaining the feature vector, to train itself to produce a classifier model.
Classifying Snacks with the Classifier Model
Now that we have done the classifier training, we can save the classifier model into a file.
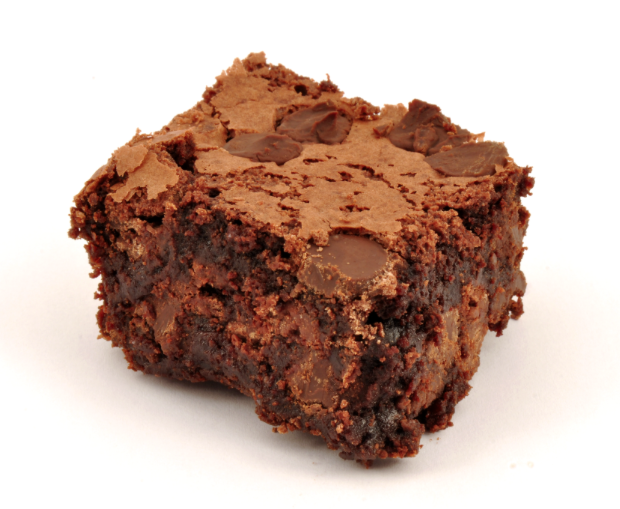
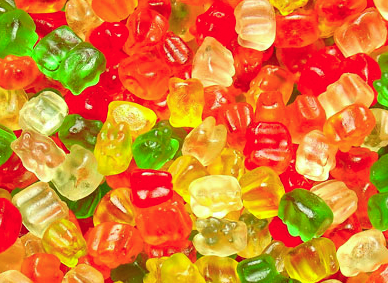
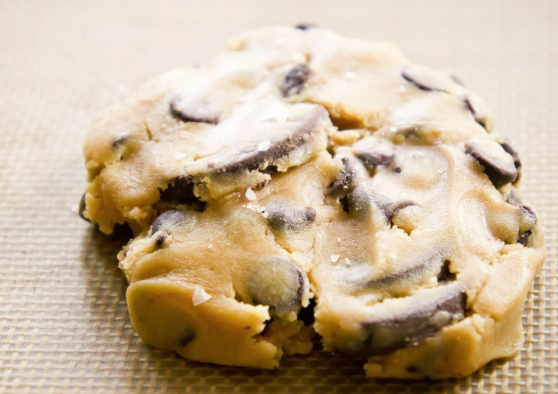
For example, we have saved the tree classifier into tree.dat. Our example tree classifier
has been trained with the labels of [brownie, candy, cookie, other]. After importing,
we can use the classifier model to classify our unknown images.
Test images:
classifierFile = 'tree.dat'
classifier = TreeClassifier.load(classifierFile)

test_img1 = Image('test_001.png')
test_img2 = Image('test_002.png')
test_img3 = Image('test_003.png')

print "test_001.png is", classifier.classify(test_img1)
print "test_002.png is", classifier.classify(test_img2)
print "test_003.png is", classifier.classify(test_img3)
The result will tell us what they are.
test_001.png is brownie
test_002.png is candy
test_003.png is cookie
Go ahead, you’re ready to configure the Snack Watcher to learn and classify some snacks!
